Keep the original front USB while adding a hidden rear USB port for a cleaner OEM-style setup. No more messy front-panel cables — enjoy a more concise, neat, and factory-like interior appearance.
Genuine RCD330 Noname 187B Radio
OEM Integration with CarPlay, Android Auto & MirrorLink, Backed by 1-Year Warranty.
For Fabia / Octavia / Superb / Yeti | Multi-Language Support | 1-Year Warranty
Apple CarPlay & MirrorLink | English / German Language | 1-Year Warranty
MQB OEM Upgrade System
CarPlay & Android Auto | Optional Rear USB-C | 1-Year Warranty
Fits almost Volkswagen models with flip badge trunk handle (Golf, GTI, Polo, European-spec Passat, CC, Beetle, EOS & more) | Supports aftermarket head units | 1-Year Warranty

How to activate the engineering mode of the RCD330 noname 187B
Quote from Ddren on September 21, 2019, 3:22 pmHow to activate the engineering mode of the RCD330 noname 187B?
step 1. Connect your car to your computer with Vcds cable. Twist the car key to the ACC position without igniting the engine. Run the Vcds software, click "select"
setp2, Click "56-Radio"
step3, Click "Adaptation - 10"
setp4, Select "Development Test Mode" from the drop down menu
setp5, The initial value in the "new vaule" text box is "0", click on "up" to the right of it, and the new value is "1". Then click "Save"
setp6, Exit the vcds software and unplug the cable. End the work.
Now you can start the RCD330 PLUS noname 187B and hold down the "setup" button for a long time until the project Engineering menu appears.
How to activate the engineering mode of the RCD330 noname 187B?
step 1. Connect your car to your computer with Vcds cable. Twist the car key to the ACC position without igniting the engine. Run the Vcds software, click "select"


setp2, Click "56-Radio"

step3, Click "Adaptation - 10"

setp4, Select "Development Test Mode" from the drop down menu

setp5, The initial value in the "new vaule" text box is "0", click on "up" to the right of it, and the new value is "1". Then click "Save"
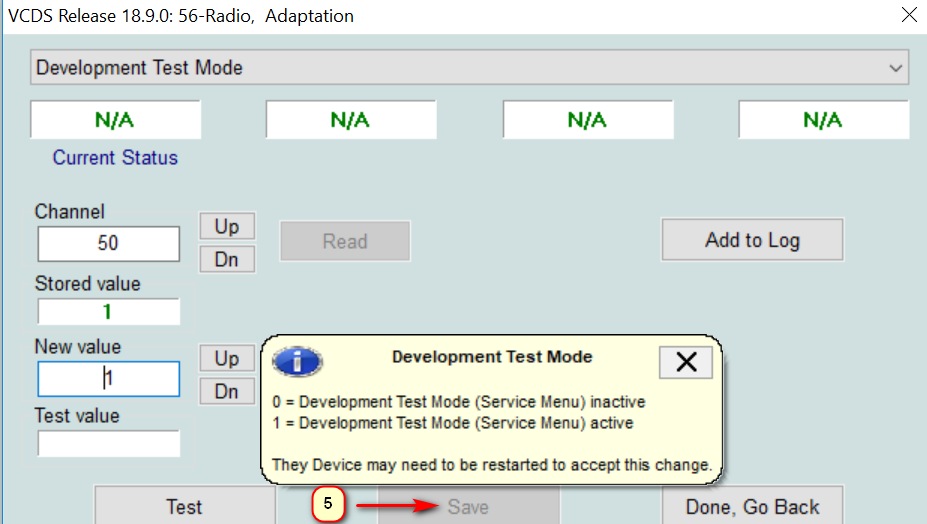
setp6, Exit the vcds software and unplug the cable. End the work.
Now you can start the RCD330 PLUS noname 187B and hold down the "setup" button for a long time until the project Engineering menu appears.

Quote from Imran William on March 1, 2021, 11:13 pmWhat kind of extra options will I have after activation?
What kind of extra options will I have after activation?
Quote from Ddren on March 4, 2021, 1:24 amAfter activation, you can test whether your microphone can work normally, you can know the detailed parameters of your memory and other hardware, and you can see some factory test settings.
After activation, you can test whether your microphone can work normally, you can know the detailed parameters of your memory and other hardware, and you can see some factory test settings.
Quote from Ddren on March 4, 2021, 1:25 amAfter activation, you can test whether your microphone can work normally, you can know the detailed parameters of your memory and other hardware, and you can see some factory test settings.
After activation, you can test whether your microphone can work normally, you can know the detailed parameters of your memory and other hardware, and you can see some factory test settings.
Quote from Ddren on March 4, 2021, 1:25 amQuote from Imran William on March 1, 2021, 11:13 pmWhat kind of extra options will I have after activation?
After activation, you can test whether your microphone can work normally, you can know the detailed parameters of your memory and other hardware, and you can see some factory test settings.
Quote from Imran William on March 1, 2021, 11:13 pmWhat kind of extra options will I have after activation?
After activation, you can test whether your microphone can work normally, you can know the detailed parameters of your memory and other hardware, and you can see some factory test settings.


